NAVIGATING THE UNIVERSE
1.Real-Time Multi-users simulation
3. SPACE NAVIGATION PROCEDURES
Step 3.1: Select one of your pilot
Step 3.2: Select a ship to board
Step 3.3: Fly into orbit with TAKEOFF
Step 3.5: Set the route to Moon!
Step 3.6: Subspace Navigation controls
Step 3.7: Fuel types speed and acceleration
Real Time Multi Users simulation
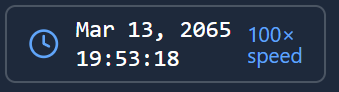
This is a massive-multi users-online simulation (MMO) so everything is dynamic in the map: look the simulation date and time in the top right card, usually there is "100x speed" this means that e.g. Planets movemements updates at 100x the real time as well as Spaceships etc...
Most of the positions are calculated server side so that all users see the same at each given time.
Visbility is "Sensor Based": you can see other player's ships (or alien ships) if they are in range of any of your ship's sensors.
To use the sensors ships shall be in space (orbiting or travelling). Docked or landed ships, cannot use their sensors.
You can see your's ships sensors ranges on the map by pressing the "V" green button in the map top right widgets.
The main Solar System Map
The Solar System Map is your primary interface for space exploration and ship navigation.
Look the main components described here:
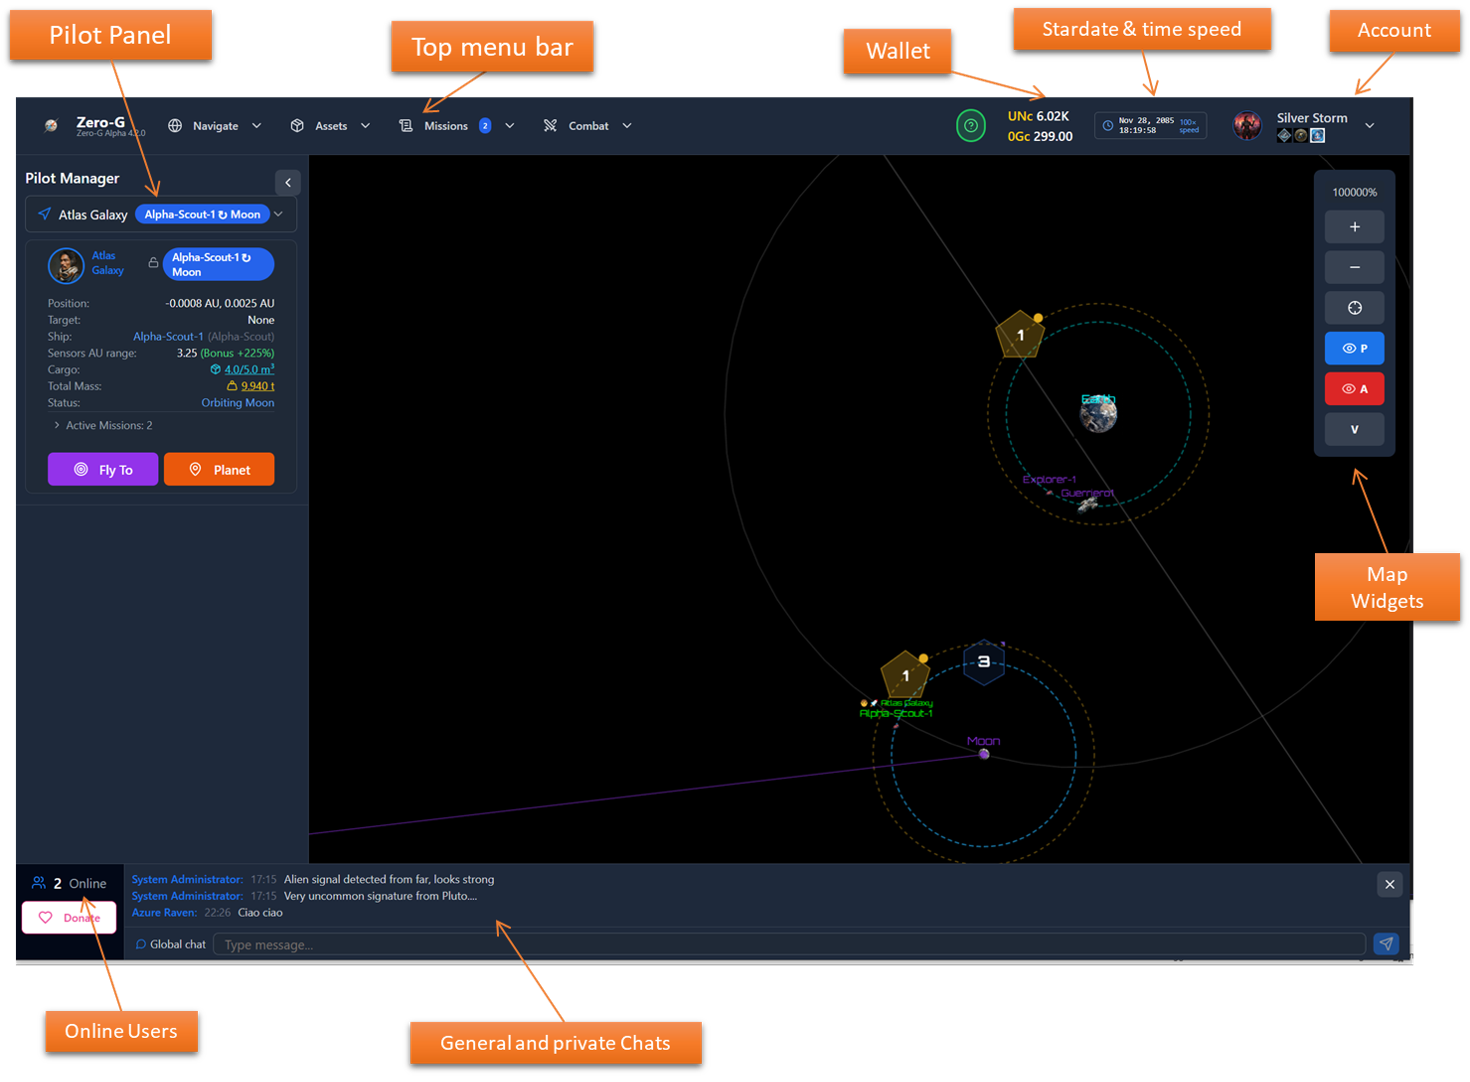
Map Controls and widgtes
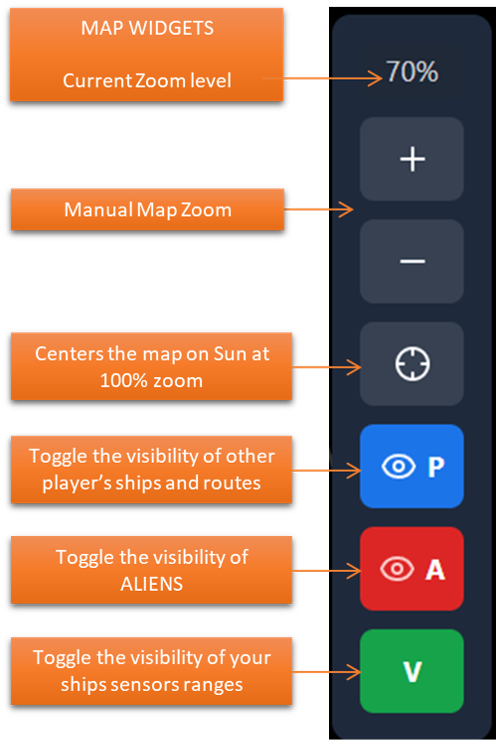
You can use the widgets on the right, or you can directly Use the mouse to:
Use the mouse wheel to to zoom in/out of the solar system view
Click and drag to pan across the map
Click on celestial bodies or to a ship to select them
Use the Navigate menu in the top bar to jump to specific planets
SPACE NAVIGATION PROCEDURES
As you may have noticed from the Welcome screen initially you have been granted one PIlot and Two Ships for free. Here it is some simple steps to start Navigating the Solar System
Step 1: Select one of your pilot
Step 2: Select a ship to board
Step 3: Fly into orbit with TAKEOFF
Step 5: Set the route to Moon!
Step 6: Subspace Navigation controls
Step 7: Fuel types speed and acceleration
Step1 Select your pilot
Chose one in your left pilot panel then click the BOARD button
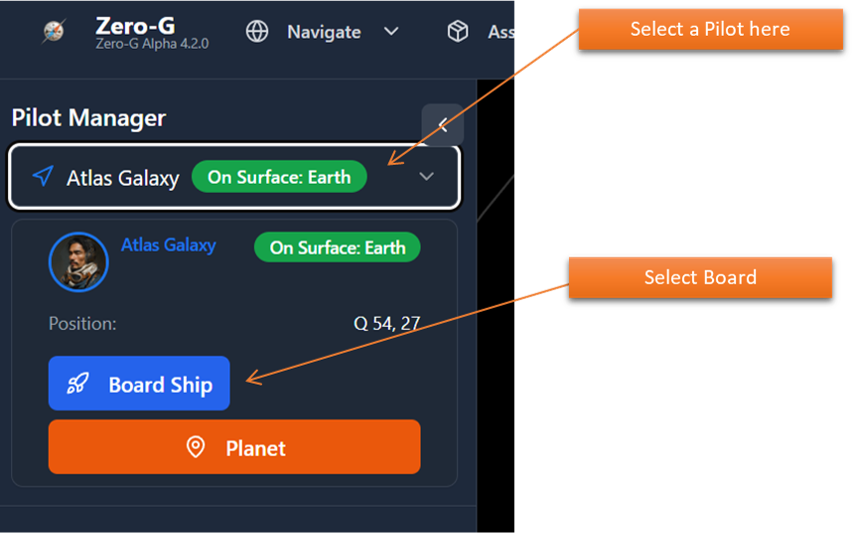
Step2 Select a ship to board
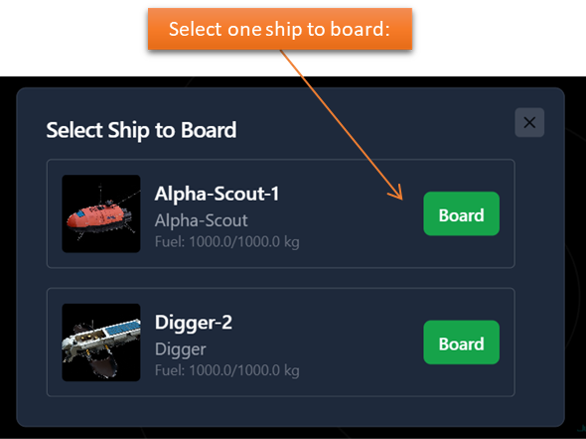
Initially you have two ships: one Scout (fast and agile with exploration bonus but small cargo) and one Miner ship (slow but with good cargo and mining bonus). To start faster better if you select the scout first.
Step3 Fly into orbit with TAKEOFF
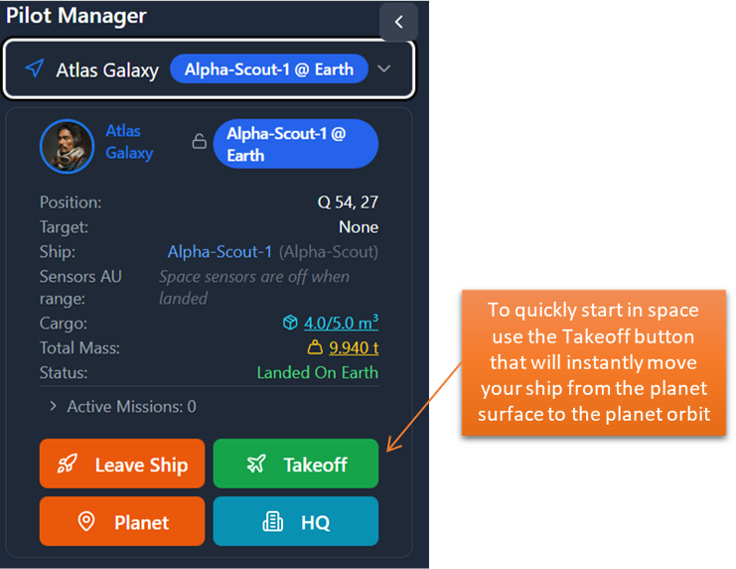
Note that, after boarding your ships, the action buttons changed to allow you different options. The left pilot panel is dynamic and will offer you different choices depending on your status badge. Also by clicking on the pilot status badge the map instantly centers on the pilot. For now, just move into orbit by using the "Takeoff" button.
Step 4 Orbiting
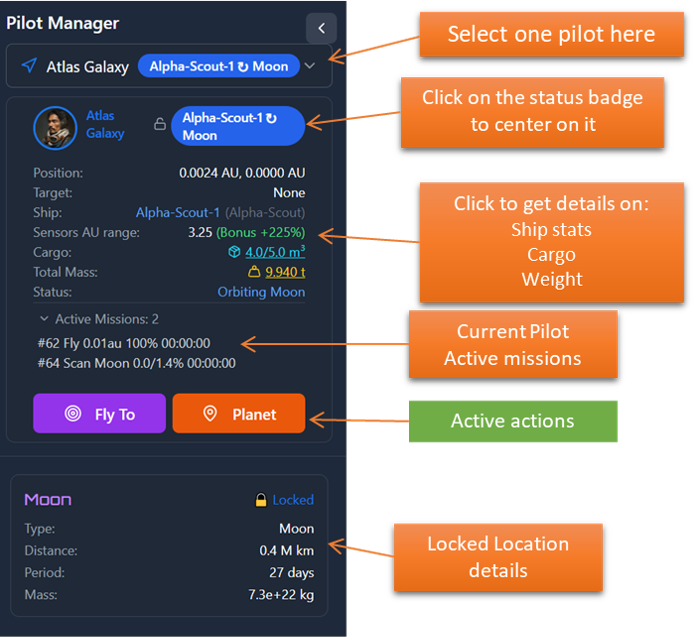
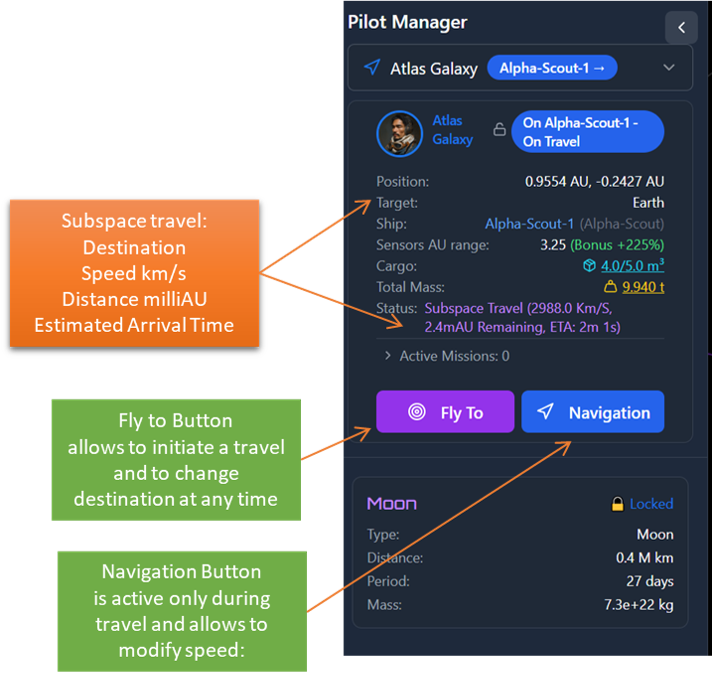
Ok now you shall see your ship in orbit around earth. Take your time to explore the left pilot panel. Consider that you can have multiple pilots doing many different things at the same time and this panel allow you to quickly select each pilot and take actions. Note that when orbiting you have two active buttons: "Fly to" that allows you to move in space, or "Planet" that opens the planet interaction page (see the help page while you are in there for detailed help).
Step 5 Set the route to Moon
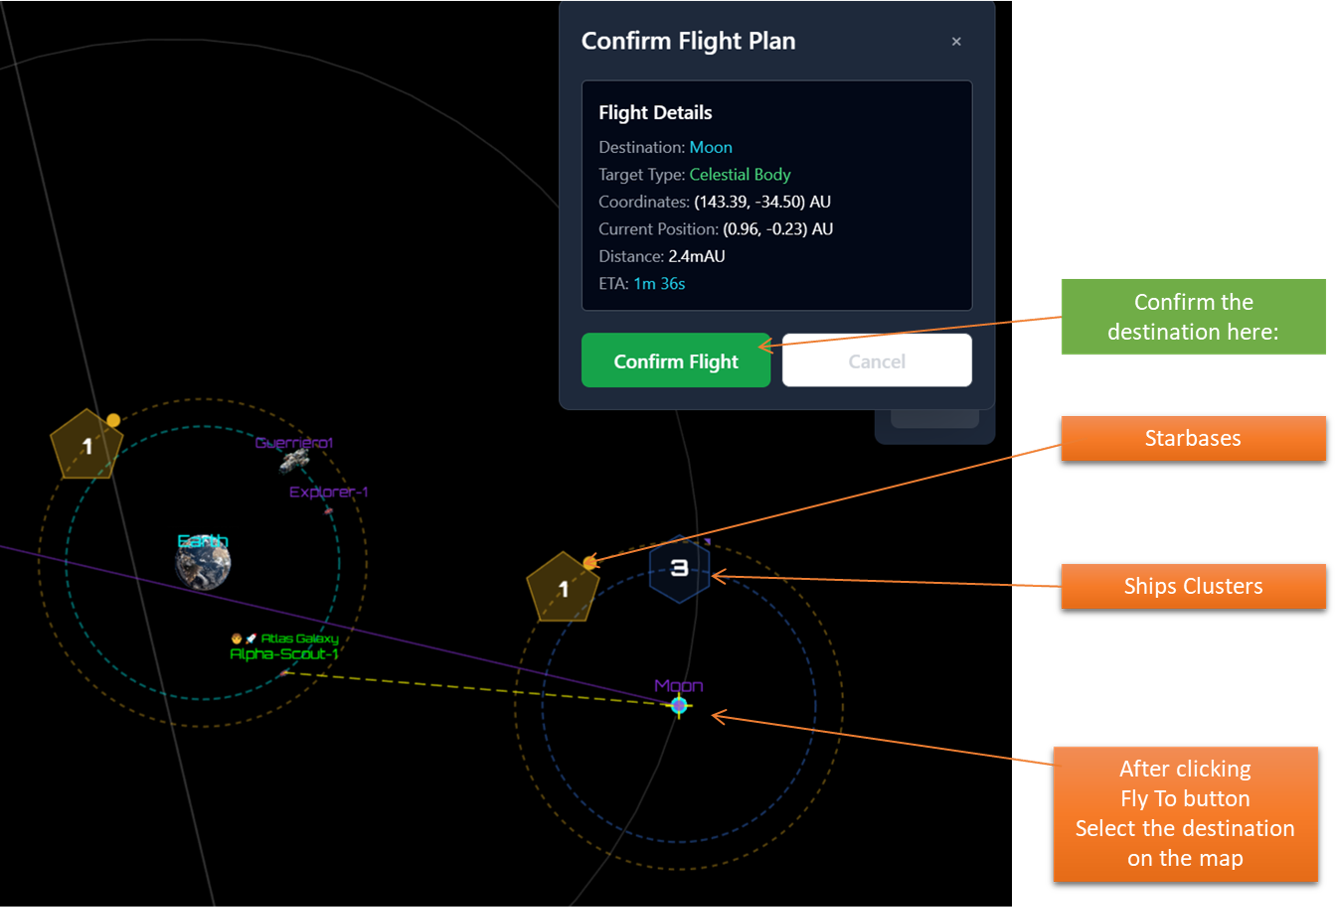
There are several way to plan your route in space, you can target different destinations: a planet, a moon, another player's ship, and "alien" fleet etc... the procedure is very easy: clikc on "FLY TO" the you can click multiple times on the map until you select the proper target. You will also see the Confirmation Flight Panel that shows you what you are targeting before confirming the flight. While targeting you can also move the map where you want, zoom, and/or directly select a planet from the top menu "Navigate" option (very useful to quickly select a far away target).
If you are a beginniner try to fly to moon for now, longer trips requires time and more advanced ships & fuels.
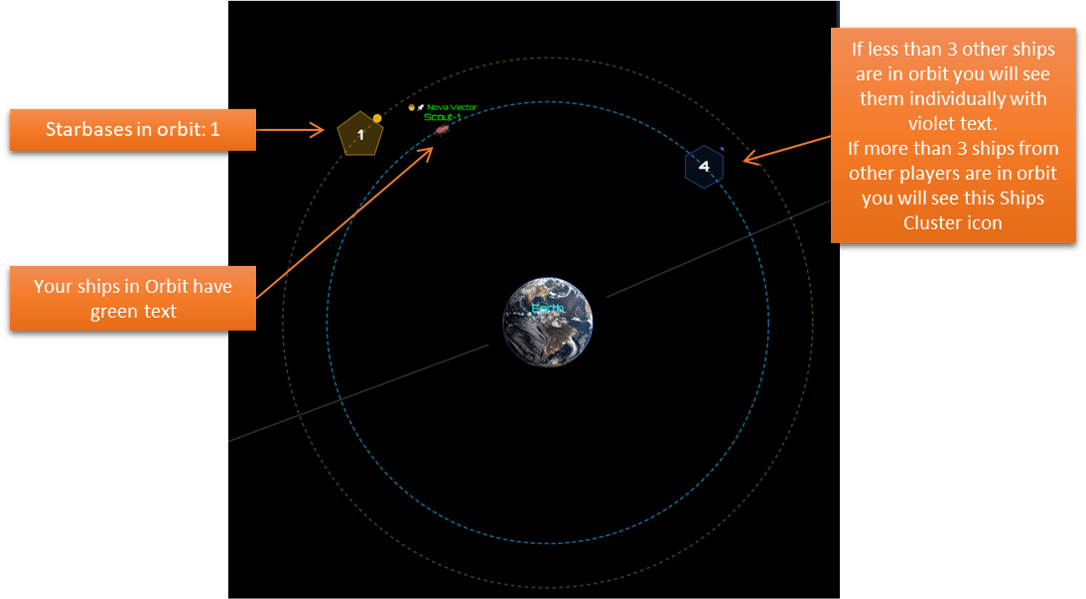
Your ship's routes are displayed in white, the violet lines are other player's routes.
If the space is cluttered by other ships Routes you can remove them by using the blue "P" button in the map top right widgtes card
Step 6 Subspace Navigation controls
There are several things to do and to check while you are in subspace flight.
At present the flight simulation has some semplification that are implemented to make the life easier for all the explorers and to not overcomplicate the simulation. So take into account that:
1. When you start flying from obit you will inherit the planet speed relative to Sun but with the direction vector that you have set (there is no realistic changing of directions)
2. If you start from a point in space your starting speed will be much lower, depending on the ship capabilities: try to avoid this at the beginning or you could end up taking several hours to go back to a planet orbit
3. When you arrive at any destination the ship stops or enter orbit instantly, "deceleration" is not implemented yet.
4. If you change direction while travelling, the velocity vector changes direction instantly to the new destination
5. Your ship route is not affected by planets or sun gravity
Overall very simple straight line travelling from one point to another.
Step 7 Fuel types speed and acceleration
If you click on the "Navigation" button (see above) a floating panel appears that you can use at any time and move around where you prefer.
This panel has several important concepts related to the Fly simulation, initially you can ignore this but, as more as you go deep into the solar system, the more you will need this.
Here it is a short list of the most important concepts:
1. The panel is tied to the ship that your current pilot is using. If you change the pilot in the left panel, this card will also change to reflect the new ship statistics.
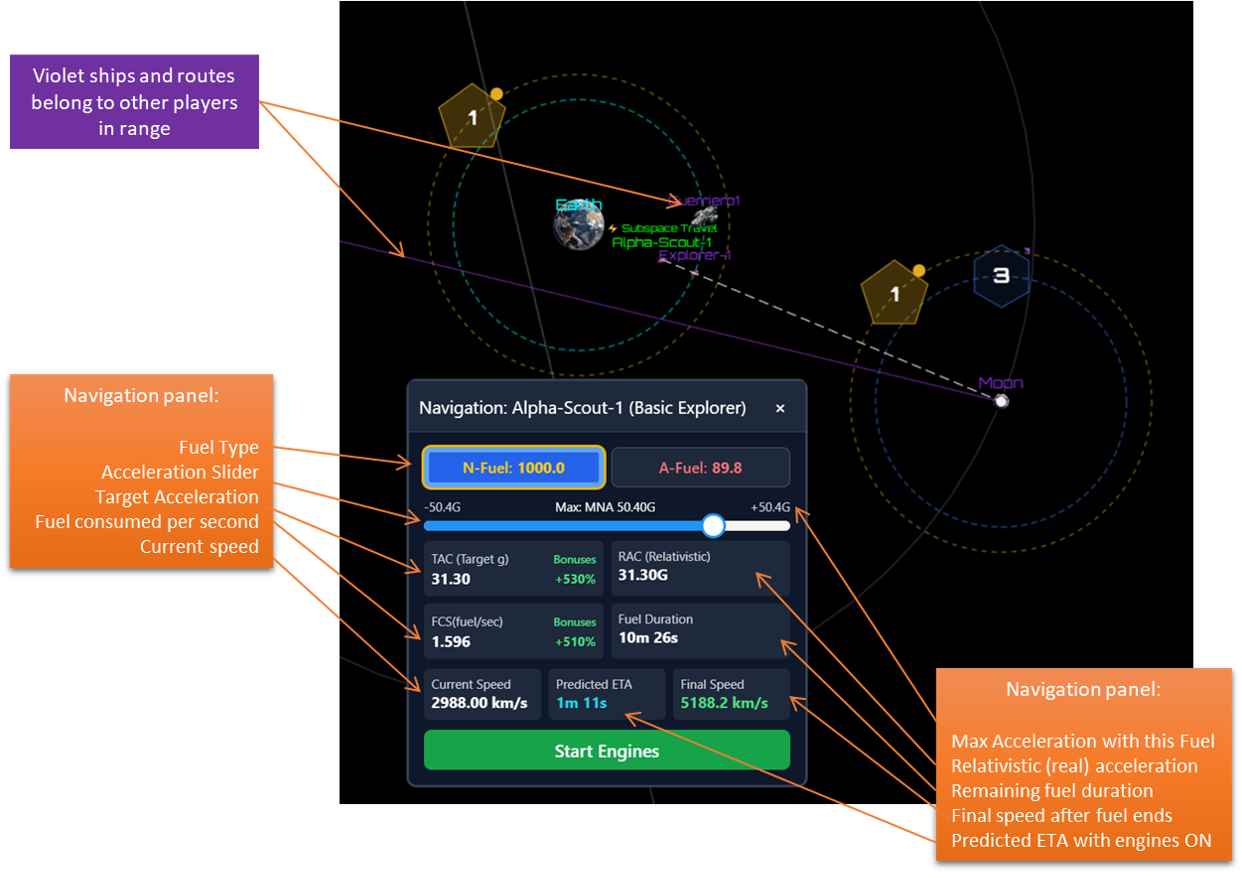
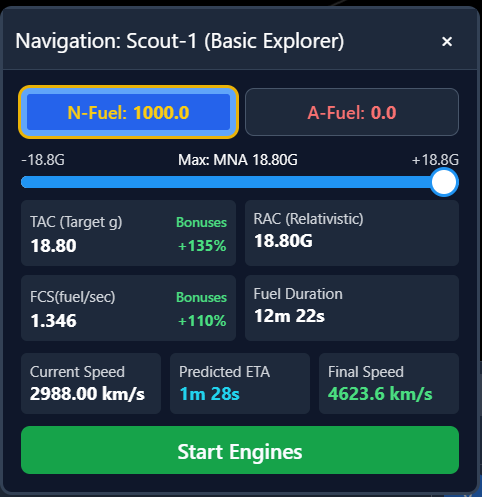
2. Each ship can use two type of fuels for now: Nuclear or Antimatter. Nuclear fuel is stored in the predefined ship fuel tank with different capacity for each ship (in the image above you see that you have 1000 units of Nuclear Fuel and 89.8 units of Antimatter.
3. Note that instead Antimatter uses the normal ship's cargo and not a dedicated tank. You can see your Ships Cargo by clicking on the left pilot panel on the cargo numbers.
4. Nuclear fuel replenish automatically as soon as you stop accelerating the ship. While Antimatter once used is gone forever and you shall buy that again at any store. You can chose which Fuel to use by clicking on the Fuel type in the navigation card.
5. The acceleration, slider below the fuel types, shows you the maximum Acceleration you can generate for the current ship with the current fuel and considering also the "Engine Bonus" you can have from many sources (e.g. Pilot skills, Medals, ship's bonuses etc... more on bonuses in the Account details page). For example for a Basic scout ship you can usually get up to 19g with nuclear fuel and over 50g with antimatter. By the way all modern ships implements an "Inertia control system" to avoid crushing the crew and the cargo when applying big accelerations :)
6. Now lets look in details the example on the left
Nuclear fuel is selected, and max acceleration is set on the Slider +18.8g. TAC indicates the desidered acceleration and is the same of the slider, currently we have +135% bonuses on ship engines (15% comes from the ship bonus, 20% from the pilot bonus and 100% from the Alpha tester medal bonus).
RAC is the Relativistic acceleration (the "real" one): as more as your ship's speed approaches the speed of light the less you will be able to accelerate (you cannot reach the speed of light in any case): look below you will see that the ship's current speed is "only" 2988 km/s so the relativistic effect is not significant.
FCS is the fuel used per second (real time): in this case is 1.345 kg/s, considering that you have 1000 kgs, this will last 12 minutes and 22 seconds as shown
Now look the bottom right card: Final Speed
This is the predicted final speed that your ship will have when the fuel will depled (after 12m 22secs), that will be 4623km/s compared to the current speed on the left.
The predicted Eta is the best estimation to reach the target considering that your ship will accelerate at 18.8G as soon as you will start the engines. In this case you will reach the destination well before the fuel will finish.
For long trips, the fuel will most certnainly finish before you will reach the destination so the P-ETA will take into account that you will make a part of the trip accelerating and the rest at constant speed.
In any case, as soon as you stop the engines or the fuel finish, the Nuclear tank will start replenshing and after sime time you will be able to start accelerating again and again to shorten the trip. Some of the Navigation data will be constantly updated also in the left pilot panel.
You can start engine and close the panel or switch to another pilot, the ship automatically will follow your orders.